June 29, 2016

My Favorite Golfer - Side Step Card

Ok, by now you might have figured out that this guy is one of my favorite characters to use ....LOL

Not only is it so much fun to color him, but he is so versatile too. In the original set, he holds the club, but I had to do something different with him this time!


This card is the last card I created for this months blog hop. 


Instead of having the steps on the left or right side, I made them go along both sides. Now came the hard part. How do I decorate them? I alternated the stamp just a little. I stamped my friend and colored him with watercolor pencils. 
Next I cut him out, but cutting the club off. I used a piece of white cardstock and colored the sky and a little green on it. The golfer then was placed with foam dots to the card. I make sure he was not floating in midair, I used a fine brush and added some grass around his feet. Voila, the middle part was done!

Now to the sides. I make the card appear more like a golf course, I added the two panels to the back step. I found a street sign stamp that I inked up only partial and stamped it on the right panel. I colored the hole around its base and added the number, the green and the sky. For the other side I decided to simply add the green and sky. I added the tall grass with my brush and some watercolor.


The middle steps were cut shorter than the back once. I stamped the club part again and since the club was a bit short, I added a little extra to the shaft (free style). I cut the club out, added some grass and adhered the club with a foam dot to the background. On the other side I  created the same background. Can you see how the ball was made?  I stamped the club again and cut the shaft off....golf ball is done. On it went with another foam dot and this card is done....


.... almost! The was stamped on white and added to a piece of green cardstock. I cut the sides and curved it over my bone-folder. I make sure it stays curved, I added one foam dot on one side and doubled them on the other side.


Interested in making a card like this yourself? Would you like to learn how to watercolor simple and easy? Contact me for more information... 


June 27, 2016

Girl Friend " Cheers to You" Birthday

Oh the funny ladies again....Don't you love them too?

I used a piece of white cardstock measuring 4"x 4 1/2". I rounded the corners and stamped the ladies in the middle. The phrase fits perfectly in the upper left corner. I did use StazOn black ink for the stamping part.

For coloring the ladies in, I used watercolor pencils and a small brush with just a tiny little bit of water! Do not use a lot of water when you are working on regular cardstock, otherwise the paper will crumble.

Keep it simple and leave parts of their clothing white.


Two design paper strips along the top and bottom of the card base and a piece of matching cardstock was used to cover the middle of the base. I raised the ladies with some foam dots and added a few rhinestones to the front.

A "Happy Birthday" stamp for the inside and a few balloons and this card is finished.

Would you like to learn more about different water coloring techniques? How to start and what to look out for to get the best results? Come join one of my water coloring classes starting back up in September. Or contact me for an individual class!


June 25, 2016

Close to My Heart Retiring Products...Say Goodbye

The brand new Close to My Heart annual Idea Book will be available on August 1st and this means, many old friends from the current Idea Book will retire by July 31st.

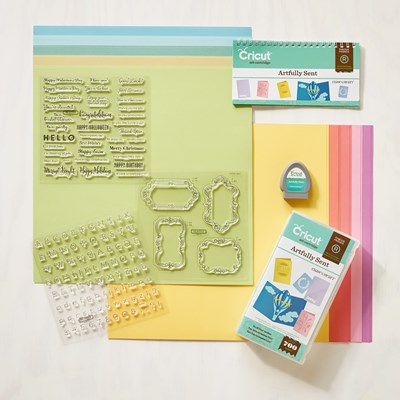
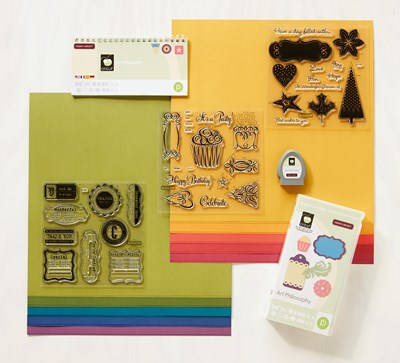
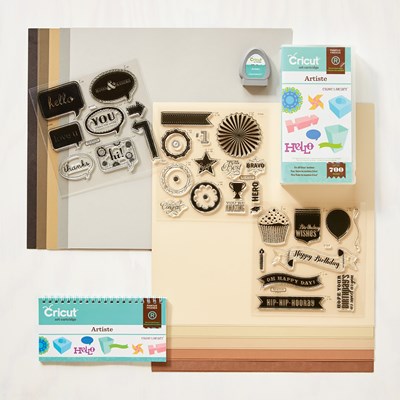
Included in this years retiring list are some of your favorite Cricut cartridges which are exclusive to Close to My Heart. Take your chance and order them until they are gone. Here are the 3 cartridges that will be gone by August 1st:

Artfully Sent (Z3168)


Art Philosophies (Z3171)


Artiste (Z3170)


If you click on the product number you will see the cartridge and all matching stamp sets for it on one page.

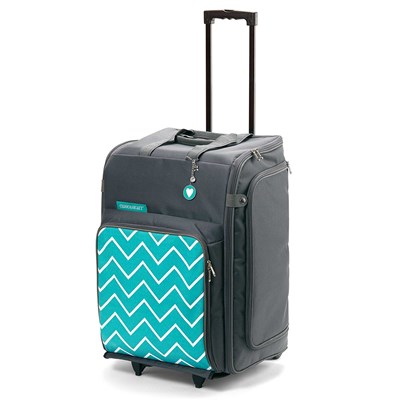
Further we also have to say goodbye to our awesome Rolling Tote (Z3032)... Don't
miss out and get it while you can.

If you like to see the whole product retiring list, email me!

June 24, 2016

Last Chance - June Flash Sale - Close to My Heart

Flash Sale
June Constant Campaign
News flash! During the month of June, we’re offering great deals on bundles of discounted Close To My Heart products every weekend! Check out my Online Shopping Website each Friday during June to find a new set of bundles. There will be lots to choose from, but you’ll need to snatch them up quick, because they’re only available through the following Monday while supplies last! Bundles will be available at various discount levels and price points throughout the month, so check every weekend to see the new offerings. Remember, these discounts won’t last forever, and some will be gone in a flash, so act quickly to score the best deals!

Dates:
Friday, June 3, 2016 at 3:00 pm (MDT) – Monday, June 6, 2016 at 3:00 pm (MDT)
Friday, June 10, 2016 at 3:00 pm (MDT) – Monday, June 13, 2016 at 3:00 pm (MDT)
Friday, June 17, 2016 at 3:00 pm (MDT) – Monday, June 20, 2016 at 3:00 pm (MDT)
Friday, June 24, 2016 at 3:00 pm (MDT) – Monday, June 27, 2016 at 3:00 pm (MDT)

June 22, 2016

Birthday Cake Side Step Card

Here are a few more pictures of the side-step-cards I made for this months blog hop.

I use the Close to My Heart stamp of the month from May which included the birthday cake, stand and candles. 

The instructions on how to make the side-step-card base can be found on previous posts ...or click HERE!

The base color is white and I added some blue plait design paper that I had leftover in my stack. You don't really need a of paper. Each step is covered and the big panel on the left.

I mounted a piece of yellow cardstock under my phrase piece. 

The cake is stamped in three parts. First the cake stand, simple in black on white cardstock. The two cake pieces were stamped once on white and once on yellow cardstock. 

In this version I cut the middle strip and the top icing part from the white cardstock image and adhered it to the yellow. For the top cake I did the same, I cut from the white stamped image the top with the scalloped edge and the little bottom piece. A few white pearls for decoration and three candles finishing the cake.

When you adhere the pieces to your steps start with the top cake piece. Place a strong adhesive only on the bottom of the cake piece and place on the top of the last step.
Fold your card flat and check how far you have to adhere the bottom cake piece to the middle step.
Last adhere the cake stand. Adhere it so the stand is flush with the top of the front step.

If you need more information or instruction or if you like to learn how to make these and other cards....email me!

June 20, 2016

A Flower Garden - Thank You Card

My card making classes are on summer break, but there are still a few cards we made so far that haven't been on the blog yet.

I am sure you have a few stamps laying around with flowers, grasses and some bees or butterflies, right? Awesome, all you need now is some black ink and in our case here some plain coloring pencils.

I am sure you have seen by now all the adult coloring books that are out on the market. There is a reason why coloring is so "in" these days and why specially adults like it so much.

Coloring not only brings back memories of our youth, oh no, it is so much more. Once you start you can't stop! It is kind of addicting yes, but also so much relaxing. With all the electronic gadgets we have these days, all the social media we have to attend too and all the bling and ring ....too much stress!

If you don't want to invest in a coloring book, how about cutting a few pieces of different sizes and from white cardstock. Stamp some of your favorite images on it and off you go. Go to were you ask?

If you have, sit outside on your patio, deck or porch or find a nice quite table with lots of light in your house. Grab your coloring pencils and your stamped images and have some fun.


Let me know how you liked the new experience and if coloring is on your to do list in the future. I know were I will spent my summer and what I will do :-) Just comment below ;-)

Well back to this card:
We stamped the different flower images and butterflies on white cardstock. We also stamped four butterflies on an extra sheet of cardstock. Now all that is left is color them in. Cut out the extra butterflies and adhere them with only a little adhesive along the bottom and body so the wings can be bend down a bit.

And don't forget to color the inside too....

Stay tuned for more....   


June 18, 2016

Tea Pot Side Step Card - Speedy Recovery

Here is side-step-card No#2 from this months blog hop.
In case you missed the hop, check back and hop along the wonderful ladies and their blogs and see what everyone came up with. Click HERE to see this months blog hop!

I have this wonderful die set from SU which is so perfect for all my little tea and coffee gifts I make. It is also the right size to decorate a side-step-card.


So I decorated the steps and the front panel with some design paper. Next I used my dies to cut out the tea pot, cups, tea bag and the steam. I used a plate stamp from a Lawn Fawn set I own and created some sugar cubs from little white squares I cut. 


I arranged all pieces on the steps like seen on the card and added the little phrase on the bottom.

Do you like to create a card like this yourself? Come join my classes and see how much fun it is. Grab a friend and we can schedule a class just for you. Any technique and card you would like to make, just contact me and we get started.


For more instructions on how to cut these side-step-cards see my post from a few weeks ago. 

Stay tuned for more things to come...


June 17, 2016

We say Goodbye to some favorite Close to My Heart Products

The brand new Close to My Heart annual Idea Book will be available on August 1st and this means, many old friends from the current Idea Book will retire by July 31st.

Included in this years retiring list are some of your favorite Cricut cartridges which are exclusive to Close to My Heart. Take your chance and order them until they are gone. Here are the 3 cartridges that will be gone by August 1st:

Artfully Sent (Z3168)


Art Philosophies (Z3171)


Artiste (Z3170)


If you click on the product number you will see the cartridge and all matching stamp sets for it on one page.

Further we also have to say goodbye to our awesome Rolling Tote (Z3032)... Don't
miss out and get it while you can.

If you like to see the whole product retiring list, email me!

June 15, 2016

I'm not deaf...I'm ignoring you - "Birthday Card" Golden Oldies

I am a huge fan of Art Impressions stamps especially the funny ladies and the golden oldies. Naturally I couldn't resist to buy a few new ones during the MegaMeet Craft Show in May.

Here is one of the newbies ;-) Love this grumpy old guy. Sitting in his camping chair I thought why not place him on the beach? 

I found some great papers from Close to My Heart to create some water, sand and boardwalk. 
My cardbase is cut at 8 1/5" x 5 1/2", scored and top folded at 4 1/4". The wood grain paper came in the May special paper pack. The water paper is from the "Regatta" paper pack and for the sand I used some cashmere cardstock all papers from Close to My Heart.


I cut three strips and sprinkled some cashmere ink onto the cardstock to give it more texture and make the cardstock look more like sand. I also ripped a small piece off along the edge which exposed the white core of the cardstock. 


I first adhered the water paper, then the sand and a thin strip of dark grey cardstock to the cardbase. The boardwalk paper is raised just a little with some thin foam adhesive strips. I stamped the phrase in black on the cardstock piece.

Now the the young gentleman in the chair. I stamped him twice in StazOn black ink. The first image, I colored in just the chair. The second image, I colored in just the guy. Using watercolor pencils is the easiest and quickest way to bring color to your stamped images. You have to make sure to stamp your image in a permanent ink, otherwise it will dissolve with your watercolors. If you prefer to use alcohol markers, stamp your images with Memento ink or archival ink, NOT StazOn! 


I then cut out the first image completely (chair and guy) and from the second image I only cut the guy out. I placed the gentleman with some thin foam adhesive onto the chair image. This layering will give you a wonderful 3-D effect and a lot of dimension to your card. If you don't want to do the double up, just simply stamp the image once, color it in and cut it out.


Place the chair on the front of your card so it looks like he is sitting right on the edge of the boardwalk.

For the inside we stamped a "Happy Birthday" on some cashmere cardstock, ripped the edges just a little and placed it on the inside. I used my black pen to draw a few strings so it looks like a hanging sign....

Let me know what you think of this card and leave a comment below. I would love to hear from you. You can also email me with questions or if you like to know more about classes and learning new techniques in small groups. Click HERE for my email!


June 13, 2016

Flash Sale going on this month

Flash Sale
June Constant Campaign
News flash! During the month of June, we’re offering great deals on bundles of discounted Close To My Heart products every weekend! Check out my Online Shopping Website each Friday during June to find a new set of bundles. There will be lots to choose from, but you’ll need to snatch them up quick, because they’re only available through the following Monday while supplies last! Bundles will be available at various discount levels and price points throughout the month, so check every weekend to see the new offerings. Remember, these discounts won’t last forever, and some will be gone in a flash, so act quickly to score the best deals!

Dates:
Friday, June 3, 2016 at 3:00 pm (MDT) – Monday, June 6, 2016 at 3:00 pm (MDT)
Friday, June 10, 2016 at 3:00 pm (MDT) – Monday, June 13, 2016 at 3:00 pm (MDT)
Friday, June 17, 2016 at 3:00 pm (MDT) – Monday, June 20, 2016 at 3:00 pm (MDT)
Friday, June 24, 2016 at 3:00 pm (MDT) – Monday, June 27, 2016 at 3:00 pm (MDT)

June 11, 2016

Say Goodbye to some favorite Close to My Heart Products

The brand new Close to My Heart annual Idea Book will be available on August 1st and this means, many old friends from the current Idea Book will retire by July 31st.

Included in this years retiring list are some of your favorite Cricut cartridges which are exclusive to Close to My Heart. Take your chance and order them until they are gone. Here are the 3 cartridges that will be gone by August 1st:

Artfully Sent (Z3168)


Art Philosophies (Z3171)


Artiste (Z3170)


If you click on the product number you will see the cartridge and all matching stamp sets for it on one page.

Further we also have to say goodbye to our awesome Rolling Tote (Z3032)... Don't
miss out and get it while you can.

If you like to see the whole product retiring list, email me!

June 10, 2016

A Year of Card Techniques ~ June Blog Hop ~ Step Cards

Welcome to


It's month six of our year long adventure into different card-making techniques, folds and paper crafting products. We hope you got the chance to hop with us each month. 

It's not to late to hop and comment to be entered into our prize drawing. If you missed any of the previous months, you can click on the month to be taken directly to the start of that month's hop.
January February March April May

This month we will be creating step cards and you won't want to miss the amazing and fun cards we've got for you today. We really love feedback, so please leave a comment on each of the blogs in today's hop. 
Each comment on the 12 hops throughout the year will be entered into a drawing for a $ 25 Blitsy.com or Stampin' Up gift certificate (Winner's Choice).

Now on with the projects.

These side step cards are so much fun to make, the hardest part is to find the right embellishments to decorate your steps ;-)

Well, my first side step card has the steps on the right side. I decorated it with this cute Birthday Cake. The front step has the cake stand attached to, the second step has the big cake adhered to and the last step is the small cake with the candles on top.


Now my second side step card has the steps to the left. I couldn't resist to use my new tea cup dies from SU. I used the tea pot for the top step and the milk cup and sugar for the second step. The third step upfront was used for the phrase. 

Since I didn't had a big phrase to go on the easel side of the card, I decided to use the big cup instead. Aren't they cute? And in case you wonder how the sugar was done...simply cut some square little cubs and place them on a plate ;-)

Last but not least, my favorite golfer these days. Here I placed the steps on each side of the card. I dismantled the poor guy just a little... His golf club somehow slipped out of his hands ....ops!

I had another stamp from Art Impressions with a tall sign post that I converted into the hole flag and the golf ball itself is cut from the club.

All items were colored in with watercolor pencils, including the background and grass!
I will have more detailed pictures and descriptions of each card on my blog in the upcoming weeks. You can find a more detailed instructions on how these side step cards are made on my Thursdays blog post. I hope you had as much fun as I had making these. Please leave a comment and let me know what you think.

Up next are the wonderful creations of Debbie!

Keep on crafting and don't forget to comment!
Have a wonderful day

Claudia


Here's today's line-up in case you get lost along the way


June 9, 2016

Step Card Technique

This months technique is called Step Card or Side Step Card. You will need a piece of paper cut at 5 1/2" x 8 1/4". You also need design paper to decorate the steps and the big front part of the card. Last but not least you need some items to decorate your steps with. 

If you would like detailed measurements where to cut and score , please email me!

The base of you card can be done in at least three different ways. Your steps can be on the left of the main part or as seen in the picture underneath on the right. 

I also created one step base that has the steps on both sides. This one is nice for all smaller items you would like to decorate on the card.

As you can see on the next picture, the side view of the base shows how the steps are folded. Once you have made the first one, the rest will come easy...


Now to the decoration of your card. You will need a few strips of design paper and a big piece for the easel part of the card. I left about 1/8" edge around the pieces.

For the step decoration, I suggest something that built's up from front to back, like this cake. The base, the big cake, the small cake and the candles. Or you can pick things that built a little scenery. See Saturdays blog hop for more examples.


Here you can see how the cake comes together when the card is folded flat and when it is standing on the the table. Make sure when you adhere the pieces that they line up.

Once my cards were done I noticed that they had the tendency to bend outward. So to make sure the steps stay nicely together I placed a few thin foam adhesives in between each valley fold. The should be towards the bottom of the fold, but not all the way done. This will keep them in a perfect shape.

I hope these pictures help explaining this technique a little bit better. Hopefully you are getting interested in making one of your own. Please feel free to contact me if you have questions or would like to know more detailed instructions. Leave a comment and let me know how you like this technique and if you have tried it before ....

Don't forget...Saturday is Blog Hop Day :-) come join us!