I know what you are saying....
but Claudia, Valentine's Day was weeks ago.
Yeap, you are right, but I just had no time to post them earlier.
I figured, these cards can be easily changed to a "Mother's Day", a "I love You", a wedding or anniversary card so I still gonna post them ;-)
I used a die for the heart and flowers.
The pink background cardstock is cut at 5 1/2" x 4 1/4" and the dotted design paper is cut at 5 1/4" x 4".
I adhered the ribbon to the design paper across the bottom and tugged the ends to the back. I then adhered the paper to the cardstock. Next I adhered the heart, flowers and phrase tag. The bow as added at the end on top of the dies-cut.
If you have some ombre papers left or a piece of water-colored paper laying around, perfect. They are great for this simple card.
The cardstock and paper is cut like the top sample. Don't adhere the design paper until you have added the vellum to it!
I added a few sprinkles with grey ink to the corners of the design paper. Next I started my vellum phrase.
Simply stamp your phrase in Versamark Ink to a strip of vellum (to the right side and the strip should be 6" or a little more). Sprinkle with white embossing powder and heat set. Use a sponge and lightly rub some pink ink on the backside of the vellum right behind the phrase. This will make the phrase show better. Carefully rip the vellum along the two long sides to create a rough edge. Now wrap it around the bottom of the design paper so that your phrase is on the right side. Secure the ends on the back of the paper and adhere it to the cardstock base.
I used a white die-cut heart, pink flowers and some rhinestones to finish off this card. Well, how do you like it? Stay tuned for more.....
February 27, 2017
February 24, 2017
Technique: So Sketchy! - Part 1
Well, I hope you enjoyed this months hop. In case you missed it, please check HERE for last Fridays March Blog Hop. Don't forget to comment here and along the way and you might be our next winner of the month.
So, what was this months hop all about? So sketchy, what does this mean you might ask? Let's start with the sketch we used for all our projects:
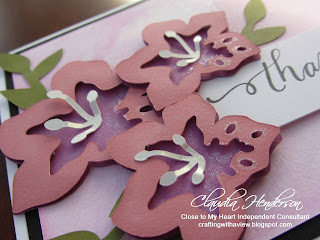
Here I started with the three flowers seen on the sketch. I didn't had the same kind, but any flower will do right? Next I cut a couple of leaves that would compliment my flowers. I stamped my thank you phrase on a piece of cardstock and cut the little flag out.
Now the background, I had a water colored background in my mind, so I got some water color paper and my paints and painted away.
Once the color was dry I sprayed some shimmer paint on it to give it a little more interest. You could sprinkled some black ink over it or if you have a stamp with sprinkles in your stack use it.
Like I do with all my cards, before I adhere everything in place I like to play :-) Yes, have fun and play around. See how the card changes when you place the items in different arrangements. Remember, the sketch is just and idea. Flip it, turn it, place the items to the right, the left, to top or the bottom...just have fun.
This way you will get a better feeling what it looks like and the advantage, nothing is secured yet...
While I did this with my elements, I noticed that my background kinda disappeared on the card base. My first rule when this happens, take some black, mat it behind the background and see if this makes it pop. Well, and most often it does as you can see.
In my second card I pretty much settled with the same elements, just a different type of flower. My background is done with yellow watercolor paint and in this case I wanted it to melt with the card.
I did used some white cardstock for matting, but this was needed since my watercolor paper was of the thinner kind and was to wobbly. The matting helped to flatten it out.
The flowers are cut with my cutting machine, but you can use and dies or punch ones too. I know, mine don't look like yours, right. They are not flat because I flipped them over and used my stylus and a foam mat to shape them just a little. Carefully run your stylus or better a shaping tool from the tip of each pedal to the middle, then flip the flower over again and press in the middle so the yellow flower can fit inside.
A little effort, but I like how it makes the flowers look more realistic. And again a few leaves are draped around the flowers and a tag stamped with a phrase is attached to the front. I found this little "sparkle" stamp in my stack and stamped it around the flowers. This time I used my brush and some black ink and flicked it over the top part over the card front to create a few sprinkles. A few bling stones and this card is done.
You see, starting out by following a sketch is not that hard to do. It is a great tool to teach you some basic layout rules and it will help you to gain more confidence in what you are doing. Play around with your card parts and see how they look when placed in different spots on the card.
Sometime if thing don't wont to work out at all, I just drop them over my base and see where they fall ...LOL... yes, this is how sometimes the best ideas are born. This "technique" is also perfect to place sequins or little items in a more random pattern.....try it, it's fun and that's what creating is all about, right?
That's it for this Technique Friday special. Turn in during the week and make sure to check out next Fridays part 2.
Thanks for reading along (sorry got a little long this time) and I hope you enjoyed it. Leave me comment or if you have questions feel free to contact me. See you back here soon....Happy Crafting!
So, what was this months hop all about? So sketchy, what does this mean you might ask? Let's start with the sketch we used for all our projects:
A sketch is an idea for a layout. Yes, it's that simple! It is an idea and you can follow the sketch to the teeth or you put your own spin on it. Sometime, especially beginners have a hard time to get started to make their own cards. A sketch is a helpful tool to get started. You can find sketches in many places these days: Internet, Pinterest, etc. But you don't even have to go that far. Any card you might see can be converted into a sketch!
So, next time you see a card you really like, take a picture or save it on you device and when you get back to your "craftroom", pull it out and place it on you desk. Next think of what colors you would like to use...the easy way, copy the once in the card or pick a color combo you like. Maybe the pillow next to you has some colors you like...
Check which other elements are included in the card and see what you have in your stack. Maybe you have a flower stamp, or a punch to create flowers, or some embellishments that fit the theme.... and that is it!
Here are two examples of cards I made that are close to the sketch. I did these on purpose so close to the sketch to show how easy it can be to interpret a sketch.
Here I started with the three flowers seen on the sketch. I didn't had the same kind, but any flower will do right? Next I cut a couple of leaves that would compliment my flowers. I stamped my thank you phrase on a piece of cardstock and cut the little flag out.
Now the background, I had a water colored background in my mind, so I got some water color paper and my paints and painted away.
Once the color was dry I sprayed some shimmer paint on it to give it a little more interest. You could sprinkled some black ink over it or if you have a stamp with sprinkles in your stack use it.
Like I do with all my cards, before I adhere everything in place I like to play :-) Yes, have fun and play around. See how the card changes when you place the items in different arrangements. Remember, the sketch is just and idea. Flip it, turn it, place the items to the right, the left, to top or the bottom...just have fun.
This way you will get a better feeling what it looks like and the advantage, nothing is secured yet...
While I did this with my elements, I noticed that my background kinda disappeared on the card base. My first rule when this happens, take some black, mat it behind the background and see if this makes it pop. Well, and most often it does as you can see.
In my second card I pretty much settled with the same elements, just a different type of flower. My background is done with yellow watercolor paint and in this case I wanted it to melt with the card.
I did used some white cardstock for matting, but this was needed since my watercolor paper was of the thinner kind and was to wobbly. The matting helped to flatten it out.
The flowers are cut with my cutting machine, but you can use and dies or punch ones too. I know, mine don't look like yours, right. They are not flat because I flipped them over and used my stylus and a foam mat to shape them just a little. Carefully run your stylus or better a shaping tool from the tip of each pedal to the middle, then flip the flower over again and press in the middle so the yellow flower can fit inside.
A little effort, but I like how it makes the flowers look more realistic. And again a few leaves are draped around the flowers and a tag stamped with a phrase is attached to the front. I found this little "sparkle" stamp in my stack and stamped it around the flowers. This time I used my brush and some black ink and flicked it over the top part over the card front to create a few sprinkles. A few bling stones and this card is done.
You see, starting out by following a sketch is not that hard to do. It is a great tool to teach you some basic layout rules and it will help you to gain more confidence in what you are doing. Play around with your card parts and see how they look when placed in different spots on the card.
Sometime if thing don't wont to work out at all, I just drop them over my base and see where they fall ...LOL... yes, this is how sometimes the best ideas are born. This "technique" is also perfect to place sequins or little items in a more random pattern.....try it, it's fun and that's what creating is all about, right?
That's it for this Technique Friday special. Turn in during the week and make sure to check out next Fridays part 2.
Thanks for reading along (sorry got a little long this time) and I hope you enjoyed it. Leave me comment or if you have questions feel free to contact me. See you back here soon....Happy Crafting!
February 17, 2017
A Year of Card Techniques ~ February Blog Hop ~ So Sketchy!
Welcome to the February's
"A Year of Card Techniques" blog hop
First off....congratulations to Jennifer Earley our January blog hop winner! Make sure to shoot an email over to Theresa to claim you prize :-)
Well, a sketch is nothing more than a design inspiration. For all beginners, this is a wonderful easy way to get started with your card making adventure. Sometimes all these gadgets, papers, tools and wired expressions we use are intimidating for starters and these little simple tools will make your life really easy. If you are a pro, well these can help you to get your mojo flowing again if you ever get stuck ;-)
The entire blog hop team used the same sketch for their cards. This is how the sketch for all of us looked like:
This month I will show you how simple it can be for beginners to create some wonderful cards following this simple sketch. Always remember, the sketches are just an idea and don't have to be followed completely. You can try this layout on landscape (horizontal) and portrait (vertical) bases; move the flowers and tag to the top; change the flowers to balloons, circles,.... the options are endless.
But let's start with the basic simple layout as shown in the sketch, shall we?
This is my first card showing exactly the items as seen in the sketch. I went with 3 flowers, a tag with my saying on it and a few green leaves. The background is colored in with yellow water color and I used another piece of white cardstock for matting.
The second card has the same elements to it, but this time I placed them on a landscaped card base. Beside the 3 flowers and leaves I colored my water color background in pink and added a black cardstock mat to it. Same arrangement as in the first card and as shown in the sketch.
The last card deals again with 3 flowers some leaves and a tag, but I put my stamps to good use this time. The flowers are stamped on white cardstock three times. I then cut my stamped piece in two pieces (the bottom piece is about 1"). Next I took my yellow cardstock mat, measured from the bottom 1" plus a little for the edge around it. I stamped my phrase right on the yellow cardstock and adhered the piece in the center of my card base and another grey cardstock mat. I placed the two stamped flower pieces with foam dots onto the yellow cardstock, spaced evenly around the phrase. A little bling to finish the card off.
Well, all three cards are base on the same sketch and still look so different. If you find a sketch you like, don't hesitate to duplicate it. Ones your first card is done, try playing around and see what else you can come up with. I will have more detailed pictures and descriptions on how I made these cards on my Friday follow up here on the blog. So make sure to tune in....
So, what do you think about these projects? We love to hear from you, so please leave us a comment and you might be the lucky winner of this month. Information about this months prize can be found at the end of this post.
Hop along and see what my other crafty fellows came up with.
Next is the wonderful Wilma.....
In case you get lost on the way, here is this months lineup:
CLAUDIA ... you are here :-)
MICHELLE
This month you will have the chance to win a cute stamp set called "Easter Bunny" from Close to my Heart. A retail value of $17.95 and you can win it for FREE by simply commenting down below and along the hop. February's winner will be announced in our March blog hop.
Don't forget to comment and stay tuned ... a detailed description of these cards will follow on the next Fridays on my blog.
February 14, 2017
Happy Valentines Day...and something really sweet
Happy Valentines Day
and from Close to My Heart something really sweet for you:
In celebration of the sweetest holiday of the year,Close to My heart is holding a one-day flash sale on my Consultant website— They call it their Sweet Sale! The sale will give you a chance to get a 30% discount on selected products from Annual Inspirations and Seasonal Expressions 1.
This Sweet Sale starts February 14 at 3:00 pm MST (2:00 pm PST; 4:00 pm CST; 5:00 pm EST) and will end at that same time on February 15 . Sale prices are only available on orders placed through my website during these times. So make sure to check out what wonderful sweets are available.
To see which items will be discounted during this sale, visit your shopping cart at any time during the sale times—the Sweet Sale items will be listed on that page. All the items included in the sale are only available while supplies last, and there is no grace period for placing orders, so be sure to get your orders in before the sale ends!
February 13, 2017
Thinking of You
Here is the last of my cards from January's blog hop, well the ones I have done so far.....enough paper is left to do more ;-)
In this case I used a panel die that cuts only the inside, not around the image. First I placed it on a black card base measuring 5x7. I die-cut the front of the card, added my phrase with watermark in and put white embossing powder on it. After heat setting the powder, I ran the same die through this time with the marbled paper and the die that cuts the outside (rectangle) too.
This left me with a die cut and a niece even boarder around the image. Now comes the hard part. You have to line up the die-cutting with the black cutting of the card front and adhere both together. The easiest way would be if you have spray glue on hand, if not, well the you get a little sticky. I used Tombow liquid adhesive and spread it lightly on the back of my marble paper. This adhesive doesn't dry immediately, so you have a little time to move it in place. Press down firmly or place it under you work mat to flatten it out and have the glue set.
Now all that was left was to cut a piece of white cardstock for the message that was just as wide as the front black panel. I also cut a piece of sunset colored cardstock to fit over the whole inside which provides the lacy flower panel with a nice backdrop.
Do you like to learn more about these techniques or others? Come join one of my classes and see for yourself what you can do with a little help :-) Let's get crafting...Contact me for more information.
February 10, 2017
Happy Birthday Card and Best Fishes
What a better way to wish someone a "Happy Birthday" and "Best Fishes"?
After I was left with all these wonderful marbled papers, I got to think about what to do with them. One idea that came immediately to my mind was water, sea or ocean....right?
I first created my card base with a fold on the top. I used some LawnFawn curve dies that I have in my stack and cut through the card base, the blue marble paper and some teal cardstock that I had laying around.
First I added a piece of acetate to the front that was now missing the bottom part. Next I used the teal waved paper and added it to the end of the acetate on the front. Leftovers from the marbled paper were adhered to the top of the acetate right below the card base part.
On the inside I adhered a matching piece of cardstock from the front part and the marble paper that resembles the ocean.
I did cover the back on the front panel with a piece of cardstock too, so you wont see the adhesive that shows through the acetate.
To cover the part were acetate, ocean waves and the top of the front card base meet I used a small strip of cardstock.
I cut a few leaves and tucked them behind the front cardstock bottom and added the little fish to the acetate. I stamped a couple of swirls in different shades of blue and my phrase to the front top and my Happy Birthday card was done.
February 8, 2017
Four Panel Z-Fold Card with Blue Marble Paper
Here is the second card I made for the marble paper. It is the same four panel z-fold project as described in my post on Monday, but this time I used the blue marbled paper.
I think this multiple panel design is the perfect way to highlight the papers. If you have a handmade paper of your own or a super cute design paper that you like to show off, try this type of base for a card.
I am sure this will not be the last one I made.
Stay tuned for more cards to come....
I think this multiple panel design is the perfect way to highlight the papers. If you have a handmade paper of your own or a super cute design paper that you like to show off, try this type of base for a card.
I am sure this will not be the last one I made.
Stay tuned for more cards to come....
February 6, 2017
Four Panel Z-Fold Card with Marbled Orange Paper
This week I will show you a few close ups of some of the cards I made from the January marbleizing project. This card base actually shows a lot of the gorgeous paper we made.
The card base is created from a strip of cardstock measuring 5 1/2" x 11 1/2" plus a piece of cardstock cut at 2 3/4" x 4 1/4".
Along the long side of the 11 1/2" strip... score at 1/4", 3 3/4" and 7 1/4".
Now place your piece with the short side and the 1/4" strip to the top into your score board. Score a line at 5/8" from the top down to the last score line, leaving the bottom panel untouched.
Now remove the 5/8" strip you just created, leaving the last panel whole!
Adhere the small piece you cut earlier to the 1/4" strip of the long piece and fold in Z-form.
You just created your base :-)
I added sunset colored cardstock from Close to My Heart to each panel each one cut about 1/4" smaller than the base. You need to cut 2x for the front panel, 2x for the middle panels and 1x for the back panel.
The marble paper was again cut about 1/4" smaller than the cardstock pieces.
It is up to you how much decoration and embellishments you like to ad to your card. I kept it simple and adhered one white piece with the little crazy cake and one bigger piece of white cardstock to is, so you have a place to write your message. A "Happy Birthday" die-cut on the front and in the middle of the card finished this project off.
Please leave me a comment what you like about this card the most and if you are interested in purchasing this card or any other seen on the blog, feel free to contact me. Card making classes are available as well as technique classes and more....contact me of more details and stay tuned for more to come ....
February 3, 2017
Technique: Shaving Cream Marbleizing - Part 2
Last Friday's blog post was all about what you need for this great "Shaving Cream Marbleizing" and how to get started.
Now this Friday's post is all about the outcome of this wonderful technique.
Beside some inky fingers and colorful sink in the kitchen and some really good smelling papers, it is amazing to see what comes out of this foamy technique.
As you see on the picture on the left, I had a lot of fun and got a lot of samples out of this run.
Depending on the preparation of your foam and color combinations, you can get a really nice variety of marbles.
Here are a couple of the samplers I made in all three different color stages. I will make more cards with those papers in the weeks to come....I am even of thinking to use it for some pretty paper flowers. What do you think?
These two are pictures of a test I ran with some black cardstock. This is working really good with the acrylic paints, but I am not sure if the food colors or re-inkers would show up like this.
I love the marbles, but the only draw back by using black cardstock is that a slight white soapy residue is left on the cardstock when you pull the saving cream off.
Otherwise stunning on the black!
Let me know what you think of these samples and what would you like to use them for? Share your ideas and leave a comment....I would love to hear from you.
Now this Friday's post is all about the outcome of this wonderful technique.
Beside some inky fingers and colorful sink in the kitchen and some really good smelling papers, it is amazing to see what comes out of this foamy technique.
As you see on the picture on the left, I had a lot of fun and got a lot of samples out of this run.
Depending on the preparation of your foam and color combinations, you can get a really nice variety of marbles.
Remember, the first time you set the technique up, you prepare the foam with all the different colors and mix them well before you add the paper into the foam. Both of these samples above show the first time I put the paper into the color mixture.
The second run and results are very similar to the first one. I simply added a few more colors to the mixture. I didn't added the foam that I scraped of the first one back into my sheet yet. That's why the colors and marbles come out similar to the first one.
The next step was to add all the scraped foam back to the sheet, mix it well and add more of the colors that would stand out from the overall color mixture in on the sheet.
Since the base mixture is now tinted more with color, the paper will have a deeper base coat than the white from the paper. In the picture above it is more of a peach color, while the blue sample has a really nice light blue tint to it (Sorry, this doesn't show to much on this picture)
So, but mixing in the used foam and adding more colors to it, you paper will have a nice base coat plus a lot of marbling. The second peach picture in this segment also shows you what happens when you dip your paper in the mixture and start pulling it through the foam. Nice waves, aren't they?
Here are a couple of the samplers I made in all three different color stages. I will make more cards with those papers in the weeks to come....I am even of thinking to use it for some pretty paper flowers. What do you think?
These two are pictures of a test I ran with some black cardstock. This is working really good with the acrylic paints, but I am not sure if the food colors or re-inkers would show up like this.
I love the marbles, but the only draw back by using black cardstock is that a slight white soapy residue is left on the cardstock when you pull the saving cream off.
Otherwise stunning on the black!
Let me know what you think of these samples and what would you like to use them for? Share your ideas and leave a comment....I would love to hear from you.
February 2, 2017
100 View's - A Year of Card Techniques in January
Congratulations ....
I had over 100 views on my post for the January
"A Year of Card Techniques" blog hop!!!! Yeahhhhh...
Thank You so much for your support.
Please continue to check out our monthly blog hops and don't forget to comment. Wonderful prizes will wait for one of you who commented here or on one of the other blogs each month.
In case you missed it, this was January's Blog Hop "Shaving Cream"...CLICK HERE!
I also added two follow ups with this technique: Part 1 can be found ....HERE and part 2 will be posted tomorrow. ;-)
Thank you again my blog readers and hopefully we can top the views this month.
Happy crafting and see you soon
Claudia
February 1, 2017
February CTMH Special - Sign me Up!
The Close To My Heart Consultant opportunity awaits!
If you've ever considered signing up as a Close To My Heart Consultant, now is a great time to finally do it! When you sign up, you get the following:
- New Consultant Kit full of products valued over $200
- $50 in Select Product Credit
- 22% commission on additional product purchases and sales
- Flexibility to earn extra income while working your own hours
Plus, if you sign up in February 2017, you will also receive the February, March, and April Stamp of the Month sets FREE - an additional $53.85 in retail value!
Let me know if you are interested in joining my team. If you like to start your own business or even if you just get in to support your hobby, this is the perfect time for you. Contact me if you have questions or like to know more about this great opportunity. You can CLICK HERE to sign up too.
Subscribe to:
Posts (Atom)