March 28, 2018

Rejoice Card with Silver Cross


Here is the last Easter card from our March Cardmaking Class. 

We used again a 5 1/2" x 5 1/2" card base with the fold on the top. We cut a scalloped edged 5 1/4" square from purple cardstock and adhered it to the base.

The design paper square was cut at 4 1/4" but before it is adhered to the center of the card, we have to put it aside.

Take both pieces of green ribbon and fish it through the hook of the little silver cross. Now flip the design paper over and place the adhesive from your runner on the top right and left side. Start with pushing two ends of the ribbon into the adhesive. 


Flip the paper carefully over and straighten out the ribbons and cross. Now simply fold the other two ends of the ribbons over and press to the backside.

Make sure everything is straight upfront before you add adhesive on the whole backside of the design paper. Center it on the purple cardstock piece.

All that is left to do now is add a little tag with a phrase to the front by using foam dots. Decorate with a little rhinestone and stamp the inside as well.


March 26, 2018

Easter Bookmark Card


This card can be used for Easter or you can change it slightly to a different theme. The basics stay the same.

The card base is a 7" x 5" card with a fold on the left side. I folded the front part of the card in half. To make sure the half would stay towards the left I used some red sticky tape to adhere it.

Now to the part where you create the pocket for your bookmark. The front (half) panel of the card will be adhered to the back panel with two strips of red sticky tape placed on the top and bottom of the half panel.


For the papers, we used blue cardstock measuring 2 1/2" x 6" and adhered it to the front, flush with the top. A small piece of design paper 2 1/2" x 1 1/4" is run through a scallop edge border punch and also adhered it to the bottom.

Another piece of design paper 2" x 4" is placed in the center of the blue paper. We stamped a phrase on an oval cutout and placed a matching scalloped oval behind it.
On the right side of the card base we stamped "There's nobunny like you" and doodled some stitch pattern around the edges.

For the bookmark we used the same papers and the same "Nobunny" stamp to decorate the strip.

There is enough room for a nice phrase or saying on the back of the bookmark.

A few rhinestones and some yellow ribbon finishing off this card.
Like I mentioned before, you can use any card base for this project. It all depends on how long your bookmark is, so it will fit in the pocket.

This card is also perfect for all these little paper pieces you have left. Why not create a stack of bookmarks with them? They can also make great gifts in itself.

Please feel free to contact me if you have questions or like to join my classes.

Stay tuned for one more Easter card to come...


March 23, 2018

Church Window Card for LED Light


For our second Easter card we used a white card base measuring 5 1/2" x 5 1/2" with the fold on top.

I used my Cricut cutting machine and a digital image of the church window to cut both layers. The window without the details was cut from the card base.

A piece of vellum cut at 2 3/4" x 4 3/4" is placed right on top of the cut out. You can adhere the vellum to the outside of the card with just a little bit of adhesive around the opening. The vellum will be covered later on.

Next I had my machine cut the window and the detailed window portion from a square piece of 5" "Tangerine" colored cardstock. I adhered the middle detailed part of the cutout on the vellum and decorated it with a small silver cross.

The square with the window is placed in a brick embossing folder. Make sure the paper is place in the folder the right way so the bricks are horizontal.

The backside of the square is covered with foam dots and adhered to the front of the card lining the window opening up with the detailed cutout on the vellum.

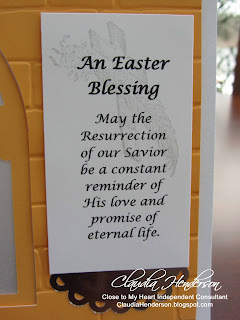
I found this phrase on the internet and used my computer to print it out. Cut to the size of 3 1/2" x 2" I used some light ink and a cross stamp to add a little background to the piece. 

Again we used foam dots to ad it to the front and a small silver decor underneath.


The inside is decorated with the same light ink and stamp used on the front.

You can also add some doodling on the inside using a black pen.


You can also use this card with a small LED light. Stand the card up and place the LED light behind the vellum. Make sure to let your recipient know ;-)

If you like to know more about the cards shown, technique used or how to join the classes, please feel free to contact me.

Stay tuned for more to come....

March 21, 2018

Easter Egg Card with Flowers


Easter is around the corner and what would be more perfect than a cute Easter Egg card? 

I started with a card base of 7" x 5" folded on the left side. I made a template from an egg shape cut with my handy Cricut machine. The template is about 1/2" bigger than the yellow cardstock layer we will later add to it.

I placed the template on the card base in a way that the top fits inside the card and the bottom is slightly hanging over the card base. 
Make sure !!!!! that your left side of the template is reaching over the fold about 1/8" so it creates a hing for the card. In case you fit the template right inside your base, well you will end up with two separate egg shapes ;-)

 The picture on the right from the inside of the card shows the hing that was created. Beside the shape, you can also see the inside stamped image that was used.

Now lets talk about decorations, shall we. These Easter Egg cards can be decorated in many different ways. This year we used a bunch of flowers to make them pretty.

I used the newest Cricut cartridge from the Close to My Heart family called "Flower Market". This cartridge is loaded with flowers and everything around it.  

I cut one flower set out in pink colors and reversed it for the blue ones. I also used the little flower vine to frame the egg even more.

The egg shape is cut about 1/2" smaller than the template from the card. I used yellow cardstock for it. The yellow layer measured 5 3/4" x 4 1/2" and I also run it through an embossing machine.

The flower vine is cut of two layers. One is the green vine base and then the little blue flowers that are adhered on the matching green spots.


The pink and blue flower bunches are a little bit more detailed. You will cut 4 layers with those. The first layer is the green one. The second is in my case a purple one which is only the flowers. This layer will fit on the green one lining up with the green flower portion. Then I cut the flowers in a dark pink and light pink (or as in the other set a dark blue and a light blue). I adhered the darker flowers first, flat on the purple bases. They also match up perfectly with the purple images. The little pink flowers will be added to one of the leaf like green buds. It doesn't matter really which one of the green leafs you pick. Finally the light pink flowers are added with some foam dots to the purple matching shapes.
You will do the same with the blue set!

I adhered the vine flowers on top of the yellow egg first. Next I laid out my pink and blue flowers and adhered them to the yellow egg as well. The phrase was stamped on a scalloped square which I cut out in pink for a second time. The pink layer is simply offset under the white layer and both have been added with foam dots to the card. 
Last but not least, a little bow is finishing of this card.
I hope you had fun with this Easter card. Stay tuned for more to come and don't forget to contact me if you have questions or like to join my classes.

March 19, 2018

Oakland Fair Spring Camp Scrap

SPRING CAMP SCRAP MARCH 22-25, 2018

Come join me for a fun weekend at the Oakland Fair grounds. A fundraiser to benefit the 2018 Oakland County Fair and the Oakland County 4-H Fair Association. Lot's of roomy tables to scrap on, home cooked meals and a ton of fun. I'll hope to see you for some scrap time.
For more information about this event and how to sign up last minute, please check out the Oakland Fair grounds website HERE!
See you this weekend!

March 16, 2018

March Card Class Projects - Easter


Welcome to my Easter Card projects for the month of March. 

The first card we created was this super cute Easter Egg card. The egg shape was transferred onto a card base measuring 7"x 5". When transferring the egg shape, make sure to have the shape overlap the left side a bit. Reason being, so you have a card base that actually opens ;-) if you fit your shape right in the center of the card all you create are two egg shapes.
The yellow egg shape is cut about 1/2" smaller than the base and run through an embossing machine. 
All flowers have been cut from the Close to My Heart Cricut Cartridge "Flower Market".  
Here is an example of a religious Easter card which could be transferred into a Sympathy card as well. The card base is a 5 1/2" x 5 1/2" and the fold is on the top. I have the window cut out of the card base front and placed a piece of vellum right over it. I glued it on the outside of the card since it will be covered with the brick part later.
I used a piece of cardstock to cut out the decorative window and while the window is adhered right in the center of the vellum, the other part of the paper is run through an embossing machine to create the brick pattern.
I found this phrase online and it was just the right one to use for this card.
When you sent this card out, make sure the owner knows that they can place a LED light inside to have the light shine through the window. 

Here is a take on on bookmark cards. You can never have enough bookmarks right? Well how about sending some greetings and including a little reminder too?
The card base is a 7" x 5" card. I folded the front part in half and adhered it to the other half. Now your card front is a half front, while the back side stays intact. Place some red sticky tape on the front half inside. Just on the top and the bottom this way you create a pocked that can hold your bookmark.

The bookmark is covered with the same papers and if you like, add a little greeting or poem to the back of it.


Last but not least, here is a card with a special little gift on the front. You can find these silver crosses in all varieties and sizes at your local retailers. I used a 5 1/2" x 5 1/2" square card base and your fold can be either on the left or on the top, like mine is. 
I cut two layers for the front. The cardstock was raised with foam dots, but hold on with the design paper layer until the cross is adhered. I simply threaded both ribbons through the cross. I then adhered both ribbon ends on the left side at the back of the paper. Make sure the cross is right side up and the ribbons are nice and flat before you adhere the other ends to the back. Now it is time to adhere the piece in the center of the cards stock. 

This is just a little sneak peek of the cards in March. Make sure to tune back Mondays, Wednesday and Fridays to see more detailed information about how each card was created.
If you have questions or like to know more about my classes, please feel free to contact me.  

March 14, 2018

Chelsea Paper - Thinking of You Card


Here is the last one of our February Card Making Class. Simple but elegant at the same time.

For this project you will need:
- a piece of Crystal Blue cardstock at 
   3 3/4" x 5"
- Chelsea design paper (stripes) 3"x4"
- piece of white cardstock 2 3/4" x 3 3/4"
- a strip of blossom cardstock
- and a small piece of white cardstock


The card base is a 4 1/4" x 5 1/2" one folded on the top.

Center and adhere the Crystal Blue cardstock to the card front. 
Use the "Chelsea Gardens" stamp set and stamp leaves in Fern ink in the corner. I stamped the image ones fully inked and then a second time without re-inking the stamp. This is how you get a lighter impression of the leaves. Add a phrase just above the leave.
The white stamped cardstock piece is adhered in the center of the striped design paper.

I adhered the striped paper directly to the card base, but you could lift it with some foam dots as well. While you could center this piece with even spacing around on the card, I decided to placed it on an angle to give it more interest.

The flower was stamped in black ink on a piece of Blossom cardstock and the cut out with scissors.

The butterfly was stamped on the white piece of cardstock and also cut out with scissors. The butterfly then was colored in with some pink and blue pencils.

Both pieces are attached with foam dots to the card base. A little rhinestone is finishing of the card.

Oh and let's not forget the inside of your card. Stamps like flowers or leaves are always great to decorate the inside. If you happen to have a nice phrase that will fit, by all means stamp it on the inside. Last, we all have a black pen laying around right? So why not doodle a little on the edges?

If you have questions, please feel free to contact me.

March 7, 2018

Chelsea Paper - Happy Birthday Card


Card three from a set of four we created in February's class.
More of the beautiful Close to My Heart "Chelsea Gardens" (X7230B) design paper and more from the "Chelsea Gardens" (C1709) stamp set.

Today we are going to make a Birthday card. You will need the following items for this card:

- card base 4 1/4" x 5 1/2" fold on the left
- butterfly design paper 4" x 5 1/2"
- grey cardstock 3" x 4"
- white cardstock 2 3/4" x 3 3/4"
- silver glitter paper 1/2" x 4"
- little scrap piece of white cardstock 


First I adhered the design paper flush with the top and bottom of my card base leaving a small edge on either site of the card. 

I stamped my phrase, leaves, flower and butterfly on the white cardstock using Charcoal, Fern and Glacier ink from Close to My Heart. I then adhered this piece in the center of the grey cardstock leaving an even space around all four sides.
I placed the piece with foam dots onto the front of my card, slightly to the top. Next I added the silver strip towards the bottom.
The butter fly was stamped onto the scrap piece of white cardstock and fuzzy cut with scissors. I used a blue and green colored pencil to color the butterfly just a bit. Another foam dot to the back and the butterfly was adhered to the corner of the grey piece. a few rhinestones giving the card a final touch.

Don't forget to decorate the inside of your card! For more information about this or any other card on my blog please contact me.


March 5, 2018

New Stamp of the Month in March


Every month Close to My Heart is offering a very special stamp set for you. This set is only available during that month and will not be able to purchase during any other occasion. 
The March Special "Birthday Time" can be ordered until March 31st!

The really cool part is, for every order of $50 or more you can get this set for only $5! Yes, a $17.95 stamp set for only $5.

Let me know if you like to know more about our products or this special.


March 2, 2018

Save Big On - Thin Cuts


Die-Namite

Close to My Heart has a very special offer for you during the month of March.

Thin Cut dies are on sale all month long with a 25% discount plus, special Thin Cut bundles are even up to 30% off.

Check out shapes, titles and sentiments for your projects and the best part, no scissors required.

Have a look at my website and see all the dies available.

Don't wait to long since all offers and dies are on a while supplies last base.

Have fun browsing and let me know if you have questions.