July 12, 2016

Watercolor Pencils, ZIG Markers, Ranger Markers, Spectrum Aqua Markers... - Part II

Yesterday we talked a little about Watercolor Pencils, the Kurateke ZIG Real Brush Markers and the Gansai Tambi paints, which all are great tools to work with. Today we will look at two more options to archive a watercolor effect.

Ranger Distress Marker:

Close to My Heart offers like many other companies (Copic, SU,...) alcohol based markers which work completely different than the watercolor markers. The Ranger Markers are based on their distress inks and therefor can be blended with water. 

You can also use them directly for coloring on your stamps. Stamp you image with the markers and use a lightly wet brush to blend the image. 

The best paper for these markers is the distress watercolor paper from ranger, but you might get good results with other watercolor papers as well.
Also available from different retailers.


Spectrum Aqua Markers:

Another great set of watercolor markers are the Spectrum Aqua markers. They come in four different sets, each containing 12 different shades of color mixes. They have a fine tip on one side and a brush tip on the other side. Again great coloring tool that comes with their own watercolor paper. So make sure if you get these pens to get the paper with it.


So which pens/ paints or markers are the best and how do I know what papers to use with them? 

All pens, markers and the paints are great tools. Each one is perfect for certain projects depending on what you like to do, how good you are with the watercolor technique and what you would love to archive with you project.

My thoughts on all of these are the following....If you are just a beginner or if you don't like to invest too much money in markers etc, then go with the watercolor pencils. You will have them for a long time and they work great on many different papers!

If you like to test the paints, try the new Close to My Heart watercolor paints and see how they will work for you. They are not expensive and might give you a good idea if you like pencils or paint the best.

If you rather would try markers, well all three, the ZIG, the Ranger and the Aqua markers are great. Important here, get the right paper!!!


Or save yourself some time and money and sign up for one of my watercolor technique classes. Find out what is so great about watercolors and how they work and you can test all these techniques to find the one that works for you. 

We will go over the individual pencils, paints and markers and how they react on papers like the once you see on the right. Also which ink to use best to stamp your images...
You will get to try all of them and we will work on a few projects for you to take home...Let me know if you are interested and we set up a date! 


July 11, 2016

Watercolor Pencils, ZIG Markers, Ranger Markers, Spectrum Aqua Markers... - Part I


Let's talk a little bit about the individual pencils/ markers and the papers needed to get the best results:


Watercolor pencils:

The perfect medium to start. I love the Close to My Heart watercolor pencil set since it gives you a good variety of colors for the start. This set includes 24 pencils and with the water blending you can create even more colors and shades.
They are easy to use and you can pretty much color on regular cardstock with them. Use them as "regular" pencils or with a little water to blend.
If you are a starter, that's the item for you!

ZIG Markers:

Another great medium to use, but I would consider these once you got a little familiar with the water coloring technique. I started with a 12 pen set, which again contains the basic colors, but I ended up liking them so much that I bought a couple of extra colors. Made by Kuretake, these pens have a brush like tip. They are very juicy and with the right paper you will be able to blend marker to marker. They can also be blend with a water brush. 

Regarding papers, I tried a couple different ones and if you have those markers and they haven't been working for you, well it might be due to the paper you used. The paper that worked the best for me was Bristol mixed medium or the Strathmore Bristol 100lb paper. So with this set of pens you would need special paper to get them to work. Otherwise, great pens and awesome results (see a card I made later next week!)
You can find them at different retailers like SimonSaysStamp.com, EllenHudson.com or others.

Gansai Tambi Watercolor Paints:

These very creamy and bright colors are awesome, but nothing for beginners. How to shade, how much water you have to use, how to control the water, all this is important for a great result with these colors. They are a bit pricey, so if you just start with water coloring, maybe you look for some other options before investing in these. 

This been said, check out our brand new Close to My Heart annual Idea Book and see the new watercolor paints we have to offer and so much more...

For either of these forms of watercolor paints, beside the pencils, you need Watercolor Paper to archive any coloring. 

Check back tomorrow with more to come ....

July 9, 2016

A Year of Card Techniques ~ July Blog Hop ~ Smooshing or Watercoloring


It's month seven of our year long adventure into different card-making techniques, folds and paper crafting products. 
We hope you got the chance to hop with us each month.

It's not to late to hop and comment to be entered into our prize drawing.
If you missed any of the previous months, you can click on the month to be taken directly to the start of that month's hop.
January February March April May June

This month we are playing with watercoloring and you won't want to miss the amazing and fun cards we've got for you today. 
We really love feedback, so please leave a comment on each of the blogs in today's hop. Each comment on the 12 hops throughout the year will be 
entered into a drawing for a $25 Blitsy.com or Stampin' Up gift certificate (Winner's Choice). 

Now on with the projects.

I love to color and I love to try different mediums. Here I used watercolor pencils, ZIG Clean Brush Markers, Spectrum Aqua Marker and some real watercolor paint from Gansai Tambi. I will explain the different techniques in the up coming week here on my blog because otherwise this blog post will get way to long :-) You will be able to see more pictures of the projects as well. So stay tuned and come back often. 
For all of you that like to try it....A good set of Water-Coloring Pencils is my absolute favorite!!! (see why next week)
Products used with card 1: Gansai Tambi, card 2: watercolor pencils, card 3: Aqua Markers, card 4 and 5: ZIG markers...


Up next are the wonderful creations of Debbie!

Keep on crafting and don't forget to comment!
Have a wonderful day
Claudia


Here's today's line-up in case you get lost along the way

July 6, 2016

Flower Vase - Best Wishes

In April we had a really fun theme for the monthly blog hop "A Year of Techniques"..."Shaker Cards". Those were so much fun to make that I couldn't stop making them.

This one is a more simple shaker version, but I really like it. It was one of the first tries I had and I decided to use only one layer of foam tape around the shaker portion. Don't skip on the tape when create yours! I only filled a few sequins inside the vase and that's why mine is still somewhat shaking, but the space between the layers is very narrow. Any objects that might had been thicker would not have moved around.


Check back to a post of my "Do's and Don'ts" in the shaker card making process by clicking... HERE !

The vase is stamped on some watercolor paper and so are the three flowers. I colored the vase with some watercolors and cut the center of the vase with my craft knife out. For the flowers I used my ZIG Real Brush markers since they have a nice bright color. 

I couldn't fine a fitting stamp for the flower stems, so I used my .5 journaling pen to hand draw them. I placed my watercolor paper over the colored background paper and drew the lines on the inside of the vase and on the top, leaving a space where the rim of the vase is.
I colored them with a little green watercolor paint and the illusion is perfect.

This shaker card technique was so much fun and if you missed the hop, click here and check it out. Jan, Feb and Mar were also great technique and you can find them here on the blog too (click on the Blog Hop label).

If you have any questions or like to attend one of my classes, please contact me so I can email you more information. 

Have a wonderful day


July 4, 2016

Close to My Heart July Constant Campaign

 
Have you ever thought about starting your own business?
Would you believe me that you can do what you love and be creative and make money with it?

Well this is your chance. Get your creative juices flowing and join my team. Close to My Heart is a wonderful company to work for. Have the freedom to work along your own schedule. Beside being able to get all these wonderful products on a discount, you can also have your family and friends join you and help you built a business you will love to work for.

This month is extra special! This Early Bird Special is an excellent opportunity for those that simply can't wait to get their hands on the exciting new products coming in the Annual Inspirations 2016-17 Idea Book. You will receive a starter kit when you sign up first. It contains everything you need to get started. On top of this awesome offer you will be able to choose from multiple "Sign-Up Special" kits which include the brand new Fundamentals paper packs and the matching Complements. The extra bundle has a value of $31.90 that you will get for free, plus a $50 Select Product Credit for signing up. This credit can be used for many products in the new Idea Book! 

Now how do you do this?
You can contact me if you have more questions about the program and how it works or if you are already familiar with our program, simply go to my website and fill out the sign up form and you are good to go.  I will help you through all the step to built a successful business. You will have all my support and I will show you how to get started. Come join my team and see what a wonderful family Close to My Heart is.

Please feel free to contact me with any questions you might have and don't pass on this awesome offer! I would love to have you on my team ....Come join me!


July 2, 2016

Don't forget! We will retiring at the end of the month!

The brand new Close to My Heart annual Idea Book will be available on August 1st and this means, many old friends from the current Idea Book will retire by July 31st.

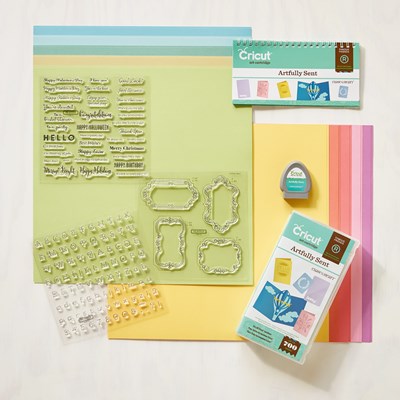
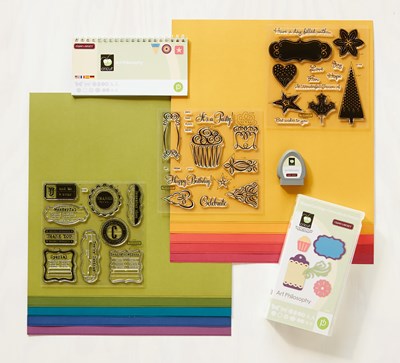
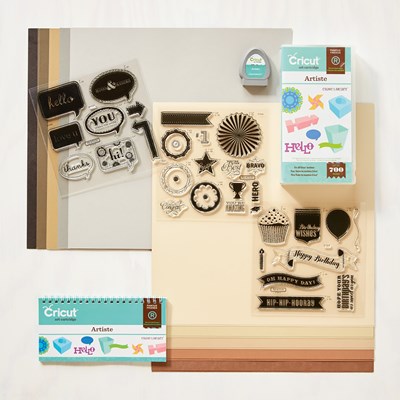
Included in this years retiring list are some of your favorite Cricut cartridges which are exclusive to Close to My Heart. Take your chance and order them until they are gone. Here are the 3 cartridges that will be gone by August 1st:

Artfully Sent (Z3168)


Art Philosophies (Z3171)


Artiste (Z3170)


If you click on the product number you will see the cartridge and all matching stamp sets for it on one page.

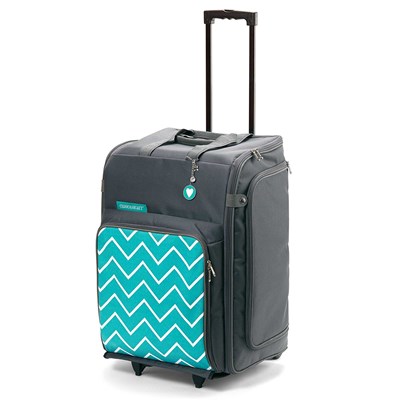
Further we also have to say goodbye to our awesome Rolling Tote (Z3032)... Don't
miss out and get it while you can.

If you like to see the whole product retiring list, email me!

June 29, 2016

My Favorite Golfer - Side Step Card

Ok, by now you might have figured out that this guy is one of my favorite characters to use ....LOL

Not only is it so much fun to color him, but he is so versatile too. In the original set, he holds the club, but I had to do something different with him this time!


This card is the last card I created for this months blog hop. 


Instead of having the steps on the left or right side, I made them go along both sides. Now came the hard part. How do I decorate them? I alternated the stamp just a little. I stamped my friend and colored him with watercolor pencils. 
Next I cut him out, but cutting the club off. I used a piece of white cardstock and colored the sky and a little green on it. The golfer then was placed with foam dots to the card. I make sure he was not floating in midair, I used a fine brush and added some grass around his feet. Voila, the middle part was done!

Now to the sides. I make the card appear more like a golf course, I added the two panels to the back step. I found a street sign stamp that I inked up only partial and stamped it on the right panel. I colored the hole around its base and added the number, the green and the sky. For the other side I decided to simply add the green and sky. I added the tall grass with my brush and some watercolor.


The middle steps were cut shorter than the back once. I stamped the club part again and since the club was a bit short, I added a little extra to the shaft (free style). I cut the club out, added some grass and adhered the club with a foam dot to the background. On the other side I  created the same background. Can you see how the ball was made?  I stamped the club again and cut the shaft off....golf ball is done. On it went with another foam dot and this card is done....


.... almost! The was stamped on white and added to a piece of green cardstock. I cut the sides and curved it over my bone-folder. I make sure it stays curved, I added one foam dot on one side and doubled them on the other side.


Interested in making a card like this yourself? Would you like to learn how to watercolor simple and easy? Contact me for more information... 


June 27, 2016

Girl Friend " Cheers to You" Birthday

Oh the funny ladies again....Don't you love them too?

I used a piece of white cardstock measuring 4"x 4 1/2". I rounded the corners and stamped the ladies in the middle. The phrase fits perfectly in the upper left corner. I did use StazOn black ink for the stamping part.

For coloring the ladies in, I used watercolor pencils and a small brush with just a tiny little bit of water! Do not use a lot of water when you are working on regular cardstock, otherwise the paper will crumble.

Keep it simple and leave parts of their clothing white.


Two design paper strips along the top and bottom of the card base and a piece of matching cardstock was used to cover the middle of the base. I raised the ladies with some foam dots and added a few rhinestones to the front.

A "Happy Birthday" stamp for the inside and a few balloons and this card is finished.

Would you like to learn more about different water coloring techniques? How to start and what to look out for to get the best results? Come join one of my water coloring classes starting back up in September. Or contact me for an individual class!


June 25, 2016

Close to My Heart Retiring Products...Say Goodbye

The brand new Close to My Heart annual Idea Book will be available on August 1st and this means, many old friends from the current Idea Book will retire by July 31st.

Included in this years retiring list are some of your favorite Cricut cartridges which are exclusive to Close to My Heart. Take your chance and order them until they are gone. Here are the 3 cartridges that will be gone by August 1st:

Artfully Sent (Z3168)


Art Philosophies (Z3171)


Artiste (Z3170)


If you click on the product number you will see the cartridge and all matching stamp sets for it on one page.

Further we also have to say goodbye to our awesome Rolling Tote (Z3032)... Don't
miss out and get it while you can.

If you like to see the whole product retiring list, email me!